How to Take a Great LinkedIn Photo at Home
Find out how to take a great LinkedIn photo at home. Practical tips for lighting, background, outfit, framing, and a more professional profile.
Date
/
Category
Portrait
Portrait
/
Writer
Milosh Bulatovic
Milosh Bulatovic

A LinkedIn photo is often the first impression you make on colleagues, clients, recruiters, and potential business partners. Before anyone reads about your experience, recommendations, or what you do, they first see your profile picture.
That’s why a good LinkedIn photo doesn’t need to be perfect, but it should look clear, professional, and natural. The good news is that you can take a solid LinkedIn photo at home, even with a phone, as long as you pay attention to a few important details.
These tips are based on my experience as a professional photographer with more than 20 years of work in business and brand photography.
What Should a Good LinkedIn Photo Look Like?
A good LinkedIn photo should give the impression that you are professional, approachable, and trustworthy. It doesn’t have to look stiff or overly formal, but it should feel neat and intentional.
In most cases, the best-performing photo is one that is:
well lit
clear and high quality
taken against a calm, non-distracting background
framed so your face is clearly visible
natural, without heavy filters or excessive editing
aligned with how you want to be perceived professionally
If your photo looks like a quick selfie, a cropped vacation picture, or a random shot taken in poor lighting, your profile will usually come across as less serious, no matter how strong your experience is.
How to Take a LinkedIn Photo at Home
A good photo doesn’t depend only on the camera. What matters much more is how you use light, framing, background, and facial expression. Here are steps that truly make a difference.
1. Stand Next to a Window and Use Natural Light
Lighting is the most important part of a good photo. If it’s poor, even a great camera won’t help much.
The simplest solution at home is to stand near a window with daylight. Ideally, the light should come from the front or slightly from the side, so it evenly illuminates your face.
It’s best to:
face the window
take the photo during the day
avoid direct, harsh sunlight on your face
use a thin curtain if the light is too strong
Avoid using ceiling light as your main source, as it often creates shadows under the eyes and gives a tired look.
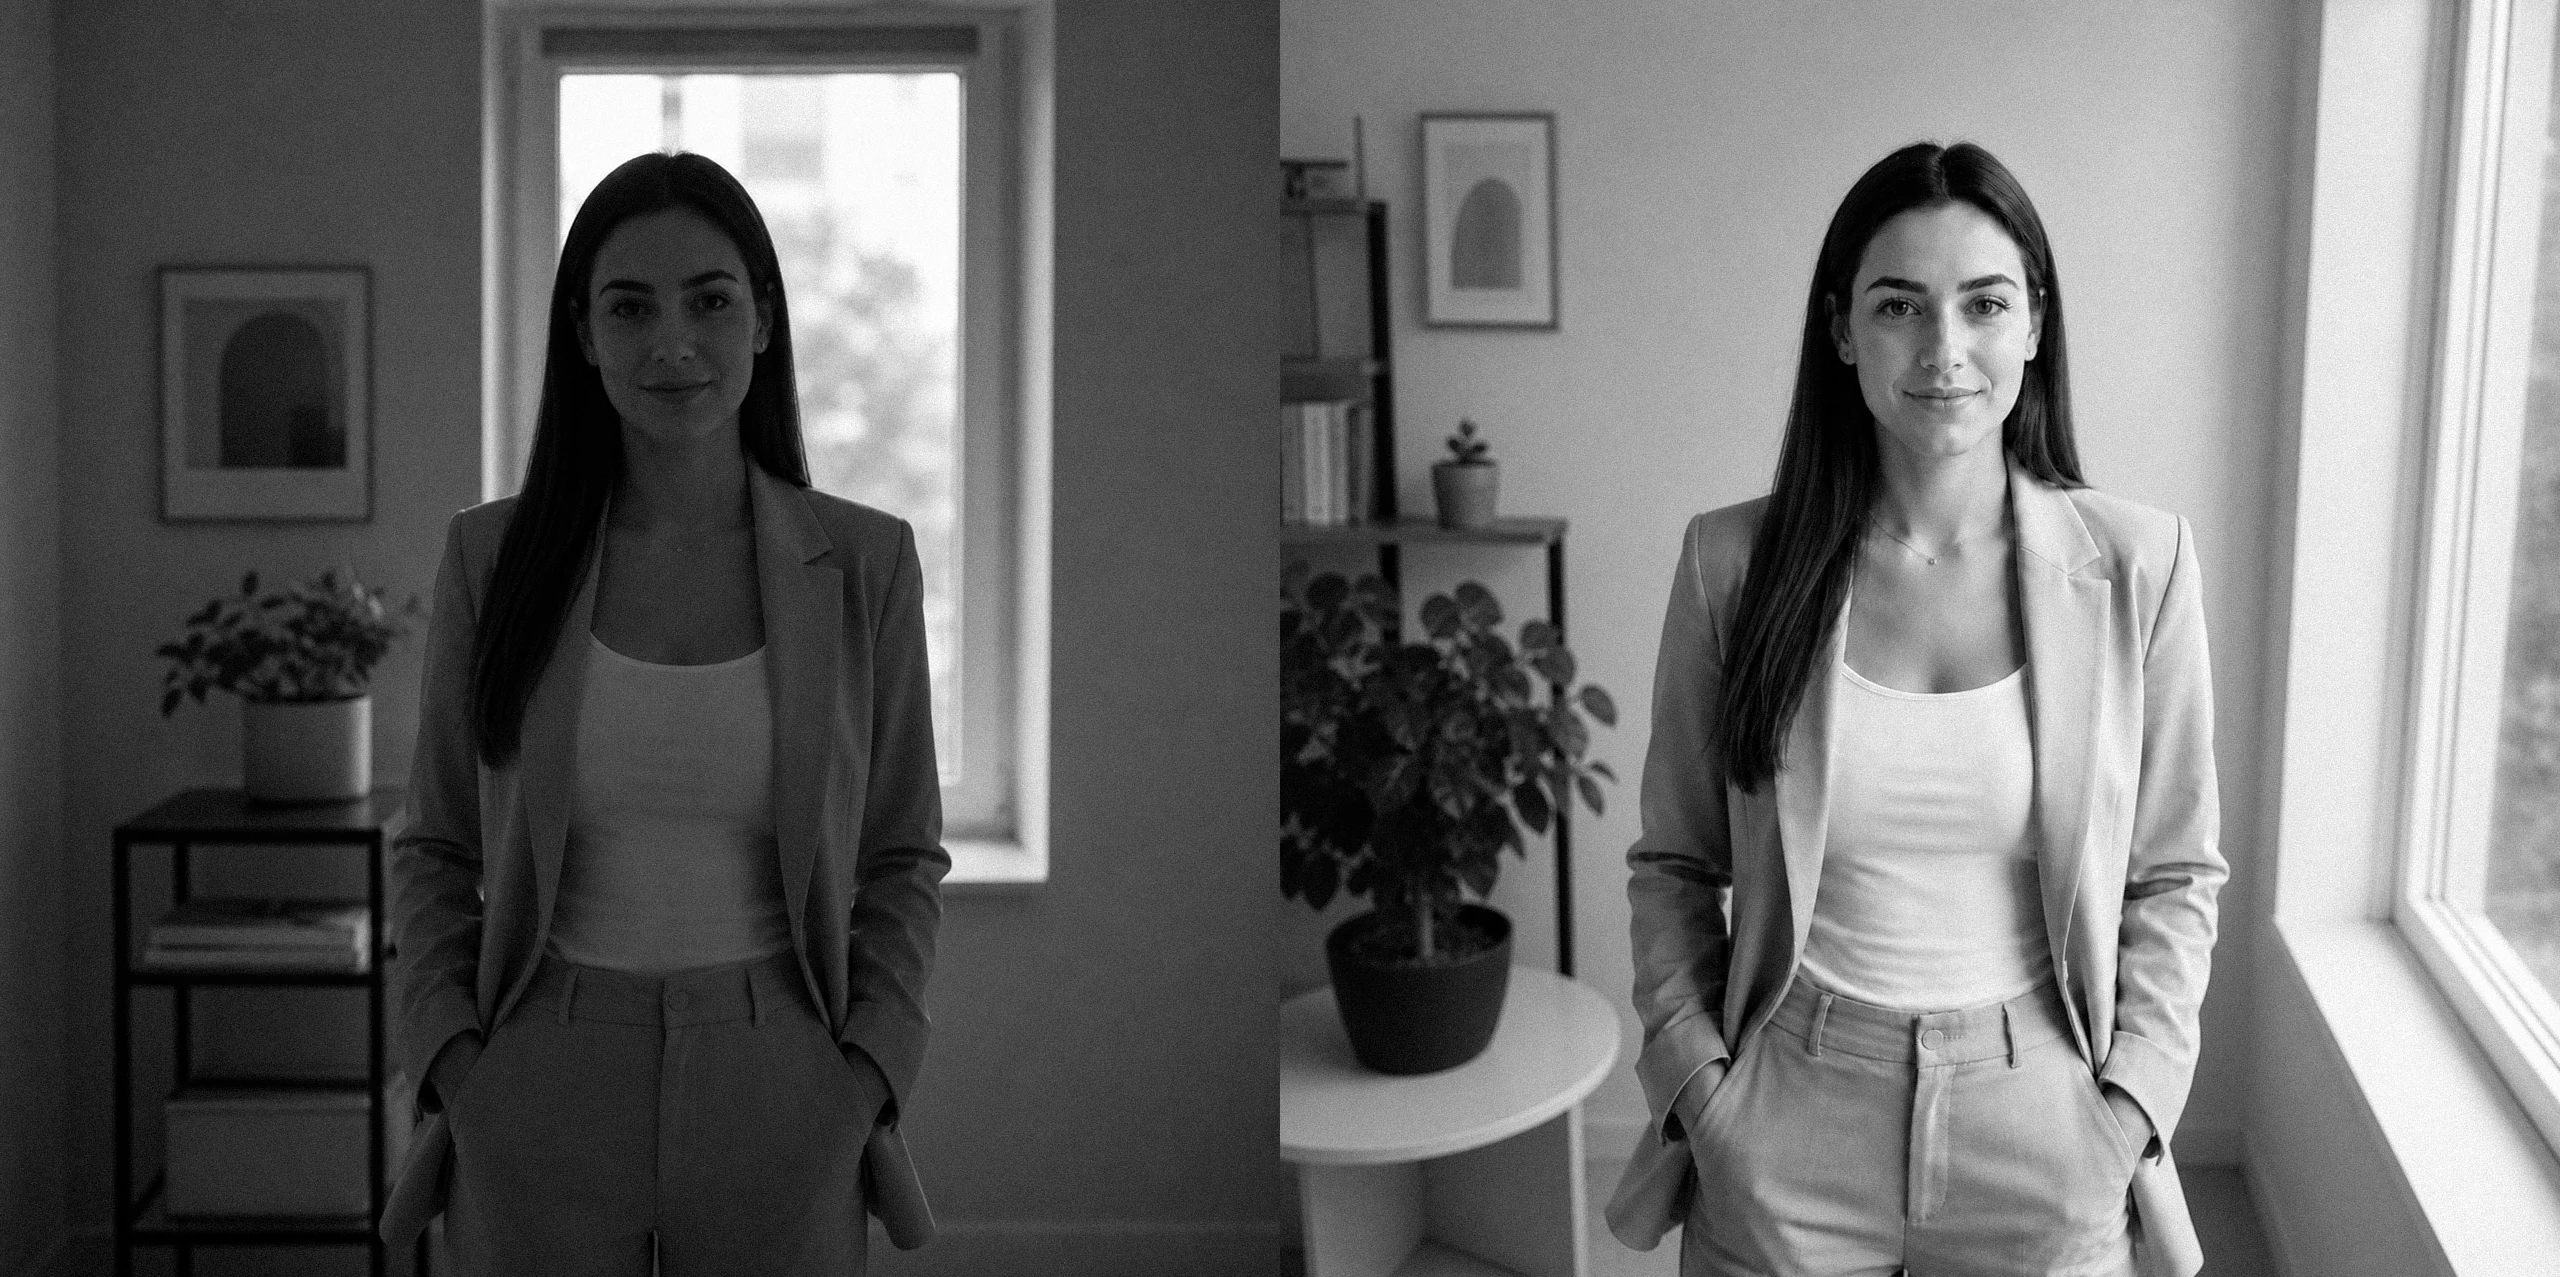
2. Choose a Simple and Clean Background
The background shouldn’t draw more attention than you. The goal is for your face and expression to be the focus.
What usually works best:
a white or neutral wall
a tidy part of a room
a simple office setting
a space with a slightly blurred background
Avoid:
clutter behind you
shelves full of details
strong lights and colorful elements
kitchens, bathrooms, cars, and similar places that feel random
The calmer the background, the more serious and clean the photo will look.

3. Dress the Way You Want to Be Perceived
For a LinkedIn photo, it’s not about being overly formal, but about looking appropriate for your field and the way you work.
Think of it this way: if you had an important meeting tomorrow with a client, partner, or employer, what would you wear? That’s usually a good choice for your photo.
What commonly works well:
a simple shirt
a blazer, jacket, or neat sweater
solid-colored clothing
neutral, darker, or muted tones
It’s better to avoid:
large text and logos
very small patterns
overly bright colors
clothing that looks messy or too casual for your profile
The key is that your outfit doesn’t distract from your face.
4. Use the Rear Camera and Position Your Phone at Eye Level
One of the most common mistakes is taking photos by hand, like a selfie. This almost always results in a worse angle, unnatural perspective, and a less professional feel.
A much better solution is to use your phone’s rear camera and place it on a tripod, shelf, or any stable surface. The camera should be roughly at eye level.
Make sure to:
keep the phone stable
keep the frame straight
avoid shooting from a low angle
not stand too close to the camera
If possible, use a 3- or 10-second timer. This gives you time to settle into a more natural pose.
A small but important tip: clean your phone lens before shooting. It sounds trivial, but it often makes the difference between a blurry and a sharp photo.

5. Frame the Photo from the Chest Up
For a LinkedIn profile, the most effective framing usually shows your face, neck, and part of your shoulders or upper body clearly.
You shouldn’t be too far or too close. Too far, and your face won’t be visible in the small LinkedIn circle. Too close, and the photo can feel overwhelming and unnatural.
A good guideline:
frame from the chest up
leave a bit of space above your head
keep your face as the focal point
look toward the camera or slightly off to the side
The goal is for the photo to remain clear and pleasant even in a small format.

6. Choose a Natural Facial Expression
You don’t have to look strict to appear professional. In most cases, a soft, natural expression creates a better impression than a serious or stiff pose.
Try to look like the best version of yourself on a good workday—calm, open, and confident.
A good approach:
relax your shoulders
slightly lift your chin
don’t clench your jaw
allow a subtle smile if it feels natural
If you look tense, take multiple shots. The first one is rarely the best.
7. Take Multiple Variations, Not Just One
People often take 3–4 photos and stop. That’s not enough. The best shots usually happen once you relax and try a few small adjustments.
Change:
your body position
the angle of your head
your facial expression
your distance from the camera
your framing
Then choose 2–3 of the best options and review them on a smaller screen, since that’s how they’ll appear on LinkedIn.
Need help with your LinkedIn photo?
8. Edit Lightly, Without Filters
Good editing can help, but only if it’s subtle. The goal isn’t to look different, but to make the photo look cleaner and more professional.
It’s enough to slightly adjust:
exposure
contrast
color balance
sharpness
cropping
Avoid heavy filters, aggressive skin smoothing, and edits that look obviously artificial. Your LinkedIn photo should look like you, just in the best light.

9. Check How the Photo Looks as a Small Profile Image
This is a step many people skip. A photo can look great when large, but not when reduced to a small circular format.
Before uploading:
resize the photo to a smaller version
check if your face is clearly visible
see if the background is distracting
make sure the crop isn’t too tight
If your face is clear, the lighting is good, and the framing is clean, there’s a strong chance the photo will work well on your profile too.
Common Mistakes in LinkedIn Photos
Many LinkedIn profiles still use photos that feel random, overly personal, or technically poor. That doesn’t necessarily mean the person isn’t professional, but the first impression can be weaker than it should be.
The most common mistakes include:
handheld selfie photos
photos taken in a car
dark or uneven lighting
overly strong editing and filters
messy or chaotic backgrounds
cropped images from weddings, vacations, or events
framing that is too distant
facial expressions that feel stiff or unapproachable
LinkedIn isn’t the place for a perfect fashion photo, but it’s also not the place for a completely random picture. What works best is something clean, clear, and authentic.
Is a Selfie Good Enough for LinkedIn?
Generally, not really.
A selfie can work as a temporary solution, but it rarely gives the best result for a professional profile. The issue isn’t just the impression, but also technical factors: the angle is often unflattering, the framing too close, and the perspective less appealing.
If you’re taking the photo at home, it’s much better to place your phone on a stable surface and use a timer than to shoot handheld.
When Is a Home Photo Good Enough?
photo taken at home can be perfectly fine when:
you want to quickly refresh your profile
you don’t currently have a professional photo
you need a neat and decent first impression
you use LinkedIn occasionally and aren’t actively building a personal brand
you have good lighting and someone to take the photo, or you can position your phone steadily
In these situations, a well-made home photo can look completely solid and much better than an outdated or random image.
When Does Professional Photography Make More Sense?
There are situations where the difference between an “okay” and a truly professional photo becomes more important.
A professional LinkedIn photo usually makes more sense if you:
are actively looking for a job
are applying for more serious or visible positions
are building a personal brand
frequently communicate with clients and partners
give talks, workshops, or public appearances
want photos you can also use for your CV, website, PR, and other business channels
In these cases, it’s valuable to have controlled lighting, guidance on posing and expression, multiple carefully shot options, and professional retouching.
If you need that type of photo, I recommend checking out our page on business portraits as well.
A LinkedIn Photo That Works in Your Favor
A good LinkedIn photo taken at home isn’t about expensive equipment, it’s about good decisions. With natural light, a simple background, neat clothing, proper framing, and a bit of attention, you can create a photo that looks professional and leaves a strong first impression.
If your goal is simply to refresh your profile, a home setup can be more than enough. But if you want a photo that seriously supports your professional presence, personal brand, or client communication, professional photography will almost always deliver a more reliable and higher-quality result.
A LinkedIn photo is often the first impression you make on colleagues, clients, recruiters, and potential business partners. Before anyone reads about your experience, recommendations, or what you do, they first see your profile picture.
That’s why a good LinkedIn photo doesn’t need to be perfect, but it should look clear, professional, and natural. The good news is that you can take a solid LinkedIn photo at home, even with a phone, as long as you pay attention to a few important details.
These tips are based on my experience as a professional photographer with more than 20 years of work in business and brand photography.
What Should a Good LinkedIn Photo Look Like?
A good LinkedIn photo should give the impression that you are professional, approachable, and trustworthy. It doesn’t have to look stiff or overly formal, but it should feel neat and intentional.
In most cases, the best-performing photo is one that is:
well lit
clear and high quality
taken against a calm, non-distracting background
framed so your face is clearly visible
natural, without heavy filters or excessive editing
aligned with how you want to be perceived professionally
If your photo looks like a quick selfie, a cropped vacation picture, or a random shot taken in poor lighting, your profile will usually come across as less serious, no matter how strong your experience is.
How to Take a LinkedIn Photo at Home
A good photo doesn’t depend only on the camera. What matters much more is how you use light, framing, background, and facial expression. Here are steps that truly make a difference.
1. Stand Next to a Window and Use Natural Light
Lighting is the most important part of a good photo. If it’s poor, even a great camera won’t help much.
The simplest solution at home is to stand near a window with daylight. Ideally, the light should come from the front or slightly from the side, so it evenly illuminates your face.
It’s best to:
face the window
take the photo during the day
avoid direct, harsh sunlight on your face
use a thin curtain if the light is too strong
Avoid using ceiling light as your main source, as it often creates shadows under the eyes and gives a tired look.
2. Choose a Simple and Clean Background
The background shouldn’t draw more attention than you. The goal is for your face and expression to be the focus.
What usually works best:
a white or neutral wall
a tidy part of a room
a simple office setting
a space with a slightly blurred background
Avoid:
clutter behind you
shelves full of details
strong lights and colorful elements
kitchens, bathrooms, cars, and similar places that feel random
The calmer the background, the more serious and clean the photo will look.
3. Dress the Way You Want to Be Perceived
For a LinkedIn photo, it’s not about being overly formal, but about looking appropriate for your field and the way you work.
Think of it this way: if you had an important meeting tomorrow with a client, partner, or employer, what would you wear? That’s usually a good choice for your photo.
What commonly works well:
a simple shirt
a blazer, jacket, or neat sweater
solid-colored clothing
neutral, darker, or muted tones
It’s better to avoid:
large text and logos
very small patterns
overly bright colors
clothing that looks messy or too casual for your profile
The key is that your outfit doesn’t distract from your face.
4. Use the Rear Camera and Position Your Phone at Eye Level
One of the most common mistakes is taking photos by hand, like a selfie. This almost always results in a worse angle, unnatural perspective, and a less professional feel.
A much better solution is to use your phone’s rear camera and place it on a tripod, shelf, or any stable surface. The camera should be roughly at eye level.
Make sure to:
keep the phone stable
keep the frame straight
avoid shooting from a low angle
not stand too close to the camera
If possible, use a 3- or 10-second timer. This gives you time to settle into a more natural pose.
A small but important tip: clean your phone lens before shooting. It sounds trivial, but it often makes the difference between a blurry and a sharp photo.
5. Frame the Photo from the Chest Up
For a LinkedIn profile, the most effective framing usually shows your face, neck, and part of your shoulders or upper body clearly.
You shouldn’t be too far or too close. Too far, and your face won’t be visible in the small LinkedIn circle. Too close, and the photo can feel overwhelming and unnatural.
A good guideline:
frame from the chest up
leave a bit of space above your head
keep your face as the focal point
look toward the camera or slightly off to the side
The goal is for the photo to remain clear and pleasant even in a small format.
6. Choose a Natural Facial Expression
You don’t have to look strict to appear professional. In most cases, a soft, natural expression creates a better impression than a serious or stiff pose.
Try to look like the best version of yourself on a good workday—calm, open, and confident.
A good approach:
relax your shoulders
slightly lift your chin
don’t clench your jaw
allow a subtle smile if it feels natural
If you look tense, take multiple shots. The first one is rarely the best.
7. Take Multiple Variations, Not Just One
People often take 3–4 photos and stop. That’s not enough. The best shots usually happen once you relax and try a few small adjustments.
Change:
your body position
the angle of your head
your facial expression
your distance from the camera
your framing
Then choose 2–3 of the best options and review them on a smaller screen, since that’s how they’ll appear on LinkedIn.
Need help with your LinkedIn photo?
8. Edit Lightly, Without Filters
Good editing can help, but only if it’s subtle. The goal isn’t to look different, but to make the photo look cleaner and more professional.
It’s enough to slightly adjust:
exposure
contrast
color balance
sharpness
cropping
Avoid heavy filters, aggressive skin smoothing, and edits that look obviously artificial. Your LinkedIn photo should look like you, just in the best light.
9. Check How the Photo Looks as a Small Profile Image
This is a step many people skip. A photo can look great when large, but not when reduced to a small circular format.
Before uploading:
resize the photo to a smaller version
check if your face is clearly visible
see if the background is distracting
make sure the crop isn’t too tight
If your face is clear, the lighting is good, and the framing is clean, there’s a strong chance the photo will work well on your profile too.
Common Mistakes in LinkedIn Photos
Many LinkedIn profiles still use photos that feel random, overly personal, or technically poor. That doesn’t necessarily mean the person isn’t professional, but the first impression can be weaker than it should be.
The most common mistakes include:
handheld selfie photos
photos taken in a car
dark or uneven lighting
overly strong editing and filters
messy or chaotic backgrounds
cropped images from weddings, vacations, or events
framing that is too distant
facial expressions that feel stiff or unapproachable
LinkedIn isn’t the place for a perfect fashion photo, but it’s also not the place for a completely random picture. What works best is something clean, clear, and authentic.
Is a Selfie Good Enough for LinkedIn?
Generally, not really.
A selfie can work as a temporary solution, but it rarely gives the best result for a professional profile. The issue isn’t just the impression, but also technical factors: the angle is often unflattering, the framing too close, and the perspective less appealing.
If you’re taking the photo at home, it’s much better to place your phone on a stable surface and use a timer than to shoot handheld.
When Is a Home Photo Good Enough?
photo taken at home can be perfectly fine when:
you want to quickly refresh your profile
you don’t currently have a professional photo
you need a neat and decent first impression
you use LinkedIn occasionally and aren’t actively building a personal brand
you have good lighting and someone to take the photo, or you can position your phone steadily
In these situations, a well-made home photo can look completely solid and much better than an outdated or random image.
When Does Professional Photography Make More Sense?
There are situations where the difference between an “okay” and a truly professional photo becomes more important.
A professional LinkedIn photo usually makes more sense if you:
are actively looking for a job
are applying for more serious or visible positions
are building a personal brand
frequently communicate with clients and partners
give talks, workshops, or public appearances
want photos you can also use for your CV, website, PR, and other business channels
In these cases, it’s valuable to have controlled lighting, guidance on posing and expression, multiple carefully shot options, and professional retouching.
If you need that type of photo, I recommend checking out our page on business portraits as well.
A LinkedIn Photo That Works in Your Favor
A good LinkedIn photo taken at home isn’t about expensive equipment, it’s about good decisions. With natural light, a simple background, neat clothing, proper framing, and a bit of attention, you can create a photo that looks professional and leaves a strong first impression.
If your goal is simply to refresh your profile, a home setup can be more than enough. But if you want a photo that seriously supports your professional presence, personal brand, or client communication, professional photography will almost always deliver a more reliable and higher-quality result.
Latest Articles.
oshtrō studio
Thoughts, ideas, and perspectives on design, simplicity, and creative process.

